My adventures in Worm Composting in a small apartment begin today!
Are you tired of throwing perfectly good food scraps, junk mail, cardboard, and coffee grounds into the trash? I certainly am, but for a long time being wasteful just seemed like one of the unavoidable evils of living in a small apartment and having no yard to speak of.
Despite this setback, I’ve been researching different compost options all summer long, hoping to find something that will work anywhere-even a small apartment-without creating offensive odors or taking up large quantities of precious space, or being overly time consuming (hey, I’m a busy girl, I’ve got a life you know!)
Some small scale homemade operations sounded promising-like one website that suggested taking a plastic container, drilling some holes (I don’t own a drill, but maybe I could have bought one…and then learned how to use it…someday….), adding a few dried lawn clippings (never mind that I live in an apartment and don’t have any dried lawn clippings), and found a spot for it outside (did I mention we don’t have a yard?) Although this “do it yourself” compost idea gave me something to feel hopeful about-really it just made me want to keep looking.
I wanted something tried and true-something easy-something that wouldn’t take all summer to learn how to do. So my next big idea was to buy a big plastic drum with the little holes for aeration already drilled in. You just roll it over every so often to redistribute the nutrients-I could have bought a huge 55 gallon drum for around $150. This might have worked fine for someone with a yard to roll it around in, but my significant other was quick to point out our small patio had no room for “rolling around.”
It was with some difficulty that I had to scratch out yet another good plan (for someone else). No, facing up to facts, what I really needed was something that could go inside…an indoor composter that was pre-made, small, practical, odorless, and not some major eye sore.
Remember grandma’s compost pile–the one that stunk every time she opened it to add a few new food scraps? That’s called anaerobic composting. Anaerobic composting is smelly because that kind of bacteria operates without airflow.
That’s not what I wanted. I wanted aerobic composting-it sounds similar, but these air-loving bacteria thankfully can get the job of composting done without the stink. Good air circulation is key. If your compost smells bad, I have it on good authority that you are doing something wrong.
Over the weekend, I finally discovered the composting solution I’ve been searching for – worms. Worm are great, really. Worm castings are full of nutrients that plants just love.
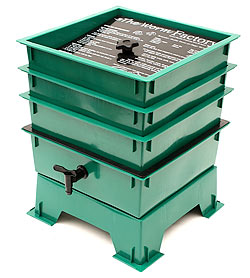
They are quiet, well mannered, polite, shy, and they’re hard workers who will work for food, helping to give my food scraps a second life. I found this amazing invention on Amazon and it’s called the Worm Factory. (I got the Worm Factory 3-Tray Worm Composter)
If this doesn’t work I don’t know what will, but I’ll keep you updated. So far I really like my Worm Factory worm composting bin. It was simple to set up and didn’t require any tools-although I did make it a little easier on myself by using a screwdriver to ease the 2 bolts into place.
The directions and pictures in the 16 page booklet were very helpful and actually interesting to read. I learned that citrus and some types of plants should not be added to the compost pile as they can harm the worms. Oh, and I learned that there are over 7,000 types of worms, but the kind you want to use in your composting worm farm are called red wigglers, also known as Eisenia fetida.
They weigh next to nothing and they recommend you start with half a pound (500 red wigglers.) Amazon has worms for sale, but I did a search on Craigslist and found a local seller of composting worms. I decided to start out small and just bought 5 dozen (60 worms) because he was charging $1.50/dozen and I didn’t see the point in going broke when red wigglers are supposed to reproduce quickly, doubling in number every three months.
They are organic worms…I guess that implies there are other worms that are not organic? I’ll see how it goes and I can always buy more worms later if needed. Otherwise, a 250 count of red composting worms on Amazon was around $30-$40.
I think it’s also great that this worm composter is designed to direct the worms to migrate upwards toward the new food sources. Because worm composting worms climb to the top of the bin your composted material on the bottom is ready to be added to your garden – you don’t have to worry about throwing all your worms out or having to sort them out first.
I also learned other helpful tips about freezing food scraps, microwaving, or chopping into small pieces to speed their decomposition. The composting worms do best between 60-80 degrees, so inside the apartment should be pretty comfortable. Pretty much everything I needed to get started with worm composting, including coir brick and shredded filling were included in the purchase price. You’ll just need red wiggler worms, about a cup of compost or soil, and a few food scraps to get started.
Other product features of the worm factory include:
- Made with post-consumer recycled plastic, Dimensions 16-inch x 16-inch x 13-inch
- Built in “worm tea” collector tray and spigot for easy draining
- Year Round Production
- Odor Free Operation
- Expandable up to 7 trays
Do you have any worm composting wisdom or experiences to share?
We would love to hear from you! Good luck and happy composting!
This handy dandy indoor worm composting kit has been updated with the Worm Factory 360 with even better functionality and features. Take a look on Amazon for a Worm Factory 360 for sale.

 Earth Friendly Goodies If it's Good for the Earth it's Good for Your Health

Does anyone have a recommendation for a composting worm starter package? I get confused when I read about them