 Earth Friendly Goodies If it's Good for the Earth it's Good for Your Health
 I was looking through a box of junk in the closet this morning and I came across several disks of a cedar branch that had somehow found their way into my possession – probably for some art project that was never finished (or started for that matter since I still had the wood disks).
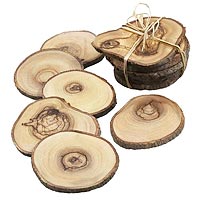
I thought to myself “what in the world can I do with these?” Coincidentally this evening I came up with some great wooden coaster ideas while searching through eBay’s World of Good for gift ideas. I came across a Fair Trade company from the West Bank making and selling olive wood coasters (last I looked I wasn’t able to find them anymore but these [easyazon_link identifier=”B001GA3WSA” locale=”US” tag=”eartfriegoo0a-20″]hard wood coasters[/easyazon_link] for sale are similar) – bingo! I had my earth friendly gift idea and a fun DIY project all rolled into one.
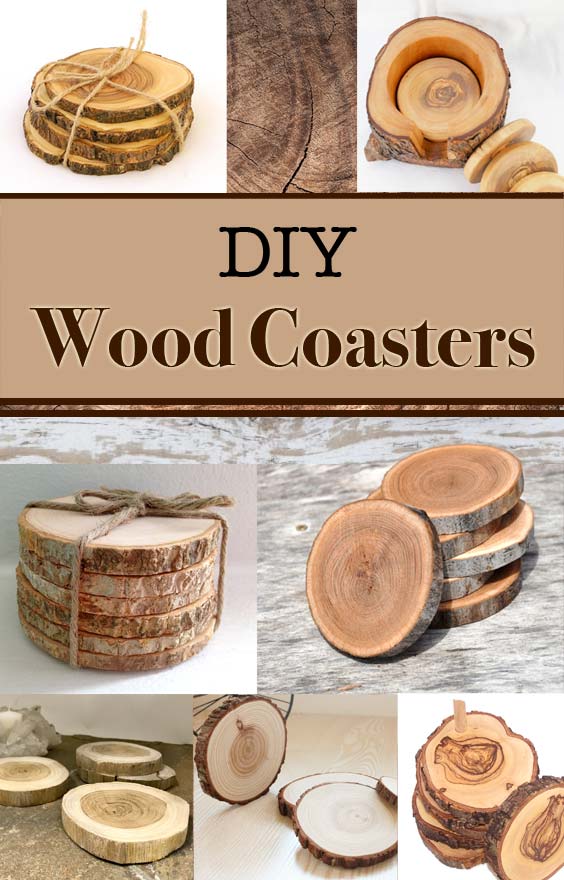
How to Make Wood Coasters with Simple Supplies and Tools:
What You’ll Need to Make Wood Coasters
• A dry tree limb – the best wood for making wood coasters is up for debate, but if you use a wood with a nice grain you can’t go wrong. I like Olive or Cedar myself because you can use them unfinished and they have a great smell.
• Miter saw (a hand saw will work but you’ll need to do more sanding – or just claim the unique shape of each coaster was intentional)
• Sandpaper or sander
• A natural stain (you could also carve into the wood or use a wood burning tool if you wanted to get real creative)
• Sealer or finish
• Felt or cork for the bottom if desired
• Glue (not to glue your fingernail back on but to hold the felt in place)
• Nice fancy ribbon to tie them all together (or just toss ’em on the table and throw a beer on top depending on your level of refinement and class – there’s nothing wrong with the beer method, it’s just that you have to use all that ribbon that’s taking up room in your closet anyway)
Watch High School Kids Making Wood Coasters
The Process of Making Wood Coasters
So on to the fun part: slice up 5 or 6 pieces of the tree limb about 3/8″ thick (I suppose I should add carefully in there, make sure that branch is tightly secured! And use safety goggles because you look cool in them trust me)
Sand one side until it’s nice and smooth, slap on some natural stain, carve a nice picture, or practice wood burning ancient hieroglyphics – you can really use your imagination to design them however you’d like.
How to Make Wood Coasters Waterproof
The easiest way to make wooden coasters waterproof is to use a clear polyurethane finish. After you finish sanding your coasters polyurethane that baby so she’s nice and waterproof, glue on felt or cork on the bottom and you are ready to enjoy the fruits of your labor.
If you’d like a visual take a peek at the video above for a little demo on how to make wood coasters with a miter saw from a high school shop class. They cut their coasters to 1/4″ which is a bit thick for my tastes but you can go with what looks right to you.
If you aren’t the Do It Yourself type (or simply want a quick option for a gift) then you can always turn to the fine folks at Amazon – and the pre-made hard wood coasters they have for sale.
Click Here Now to Watch The #1 DIY Hack
That Takes Anybody from Zero to Woodworking Hero in No Time.

By the way if you do a lot of woodworking or you just like showing off with the newest “toys” take a look at the DIY Smart Saw! It’s like a 3D printer for woodworking and you can make one yourself!
If you can dream up a project this smart saw can carve it perfectly every time. From toys to furniture to kitchen cabinets to 100 foot roller coasters (ok fine that might be a bit hard to do). If you do any kind of woodworking, even these wood coasters, it wouldn’t hurt to check out the DIY Smart Saw. See if you can save some money and impress your friends and family with your new woodworking super powers.


Those coasters look amazing. I think I’m going to try that eventually. I recently finished making a bed out of wood, which was a bit different.. but this seems very practical. Thanks!
I have a friend who planted a pine tree to remember a brother that died. My friend moved and yesterday I saw that the new owners cut the tree down. I grabbed a couple pieces of the tree about 3.5 inches in diameter and I want to make some coasters for my friend and her parents. How long should I wait for the wood to dry (it is pretty sappy) and can I speed that process up without causing the wood to crack? Or could I just cut the coasters and finish them without drying them?
Hello Cy, that is a great idea to make them something from the tree. And a good question. The ones I made were from well dried wood so I’m not sure the best process for using green wood. Besides building a cedar play set for the kids from a kit I haven’t done a whole lot of wood work so if someone else has some good advice chime in.
I’m guessing you’d want to dry them first since they will shrink some as they dry so a polyurethane finish might crack as they age, and a regular stain wouldn’t prevent the sap from oozing.
I would imagine sun drying would take quite some time, and drying them in an oven or food dehydrator might work but would have to be slow to prevent cracking. Let us know how the project goes. Good luck. 🙂
How long would these last? you gave a great idea for a decoration thanks
Thanks Nicholas, they should last a long time as they have the lacquer coating that would repel water.
I am curious how you manage to cut the discs of the same thickness? I haven’t figured it out yet. Would you please share the fact to us?
Sure Christina…. Measure, measure and measure again. 🙂 Just keep in mind the width of the miter saw blade is 1/8″ so if you are cutting on your marked line the final thickness will be slightly smaller. Me I just eyeball it, I like a little irregularity in life. 🙂
Lovely content at all..!! This is a post which provides a good info about how to make wood coasters and pleased to get it through this post. Long time I was looking forward to know about it. Thanks for sharing…
Love your wood coasters. What a great idea! We make lighted bottles and bottle lamps out of recycled glass wine and liquor bottles and naturally drink our fair share of wine. (Luckily we get a lot of empty bottles from friends and family as well, LOL.)
Anyway, my husbands parents live on a farm and I’ll have to get a nice branch next time we visit so we can make our own wood coasters. I think they will make great stocking stuffers for our family and friends.
That sounds like a great idea for stocking stuffers – love your wine bottle lamps as well, that’s another fun project – plus you get to enjoy the “fruits” of your labor. 🙂
In answer to Christina who was asking how you get the coasters all to be the same thickness, you could do one of 3 things. First, you could set up a template – basically a stop on the other side of the saw to ensure each cut is the same thickness. Two, if you have access to one, you could use a thicknesser ( I hate that word, it never seems as though it should be a proper word). Or, as has been suggested, measure very, very carefully.
I would like to make some wood coasters out of cedar and try to retain the beauty & scent of the cedar in the process. It this possible? Also, if I seal the coasters to protect them from moisture, won’t that also cause the sweat from a drink to run off of them and on to the table I am trying to protect from cup rings?
Good questions Cindy, my first thought on the issue of moisture running off the coasters is that you’d get the same thing happening if you were using glass or stone coasters as well so as long as you make the wood coasters big enough you should be able to wipe them off after you take the drink away before the water would run off the edge.
As far as maintaining the beauty and scent of the cedar, you might want to try several coats of a butcher block or wood cutting board oil. It might not be as waterproof as a lacquer but with enough coats it should offer a good amount of protection. Try to find one without much of a scent. (and make sure you wipe the coasters off soon after use)
This looks like a really great idea for a relatively inexpensive and useful Christmas gift. Not to mention, a handy-dandy little accessory for the bar top.
Really nice tutorial! I love wood, but have only made some cutting boards and “played” with wood beads. Brilliant tip with the CORK on the back, I love cork. Thank you for sharing and have a lovely day!
We all start somewhere, I think my first official wood project was a chess board in high school. I wasn’t ambitious enough to make any pieces for it though. 🙂 Thanks for stopping by.
Love to see kids using their hands instead of their thumbs! My only comment is I don’t know what kind of disc sander was being used, but most disc sanders rotate counter clockwise as you face them. The student was sanding to the right of the center of the disc which at that location the disc would be rotateing up. This could be dangerous as it could flip the material up into your face. Always sand sand on the disc where it is rotating down.
Hello, I have a cedar slice that I want to attach an air plant to and display outside. What do I use to seal this? Thank you.
Hi Laura if you stop by a home improvement store (Home Depot, Lowe’s, Menards etc…) you can look for a waterproof deck sealer. If you want to keep the same finish they have clear sealers or any number of color tints can be added if you want to give it some color.
Chris, love these coasters and the terrific suggestions and advice you offer your readers not only in the post but in the comments as well. Really enjoyed the article and great pictures of the coasters! Simply Terrific
Now this was the article i was searching for. I made my first wood coasters by using help from this well written and step by step information. Cheers
Those coasters look great. What a good idea, and a useful way to use some extra branches you have lying around.
These look great but please PLEASE be aware that using a mitre saw to cut tree limbs, or any stock that is not absolutely straight is VERY dangerous. The fences of the saw rely on the stock being straightened/machined in order to prevent the saw blade (which rotates at very high speeds) from pinching and snatching the stock, this can pinch your fingers in the fence, or worse – pull them into the spinning blade, additionally the stock will be thrown with surprising force. Speaking from experience, I wouldn’t recommend using a mitre saw unless you have the irregular stock very well secured in a squared jig, so that the stock is never in contact with either the saw bed or the fence